
Introduction
In this guide, we'll delve into the process of generating SAP notifications and then implementing them directly into ATCOM+ for better tracking, monitoring, & visibility.
Step-By-Step: SAP Notification Generation
1. Opening Notification
Within SAP users will put in their create notification code as required by the users standard

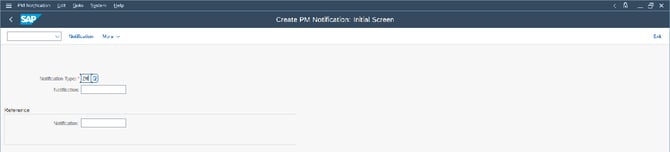
2. Initial Screen
Upon entering the initial screen the user will input the notification type, that is based off the type of work required.
3. Filling in the Notification:
Note: Not every field needs to be filled out; some will automatically fill in, while others ask for information that needs to be filled in as per the users standards.
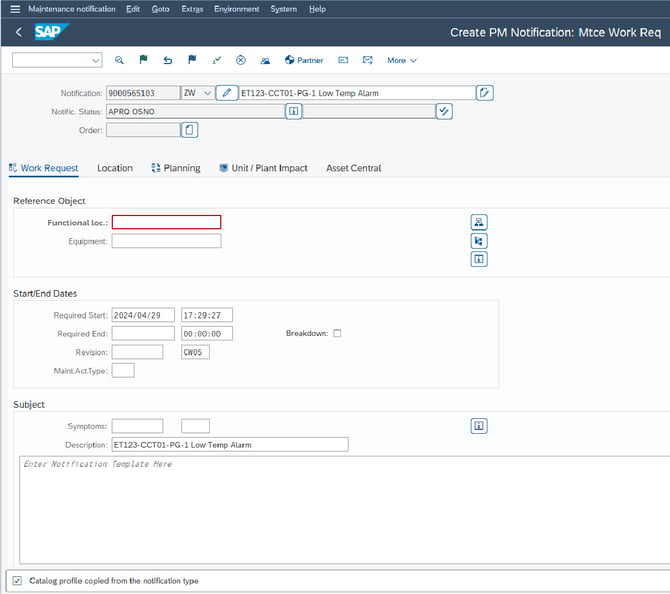
a. The Title & User Status
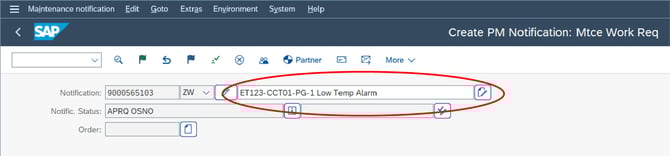
The title (Circled above in red) should always follow these guidelines
Title = (ATCOM+ Circuit Tag) (Alarm Type)
The beginning of the title should always be the EXACT SAME as the ATCOM+ circuit tag or else ATCOM+ will not connect the notification to the correct circuit.
The User Status( "Notific. Status", as seen above) should be set to minor rework or as per the users standard
b. Floc (Functional Location)
the Floc or functional location should be filled in as per users standards.

c. The Subject
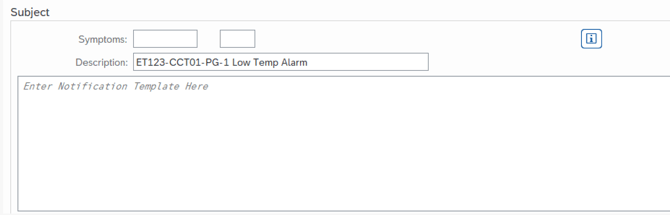
Symptoms: Must be filled out as required by the users standard.
Note: The description will match the title of this notification
Notification Template: All notification should follow this template
|
EHT Circuit [EHT Circuit Tag] Controlled by [EHT Controller Tag]-[HTC#] is in [Alarm Type]. Alarm Value = [Value] Designed Set Point = [Value] Temperature @ [yyyy/mm/dd @ hh:mm] =[Current Temp Value] IF APPLICABLE ADD A LIST OF ZONES & PARALLEL CABLES The following zones/cables are connected to the EHT circuit in parallel and need to be tested: [List of parallel zones and cables that require testing] = [Design Current] Need to investigate alarm and complete EHT walk down check sheet. EHT circuit is located at [Insert general location or close equipment tag] and is installed on [pipe tag or equipment tag] Previous repair history: [List previous work tickets] Walk down attached with highlighted P&ID |
d. Responsibilities
 Responsibilities must be filled out as required by the users standard.
Do NOT click SAVE
4. ATCOM+ Integration
a. Opening Alarm
Upon completing all information in SAP head to ATCOM+'s Validate section under Alarms. Click the checkmark beside the Cricut you are submitting a notification for.
b. Connecting Alarm
i, In ATCOM+'s Valid Alarm(s) screen. Input work order number(1) & work order description(2). The work order description will match "The Title" input in SAP. Then Click validate.


If the work order description does not match the title from SAP exactly, the notification will not be correctly linked.
ii, Return to SAP and click save to ensure your alarm notification is saved in SAP
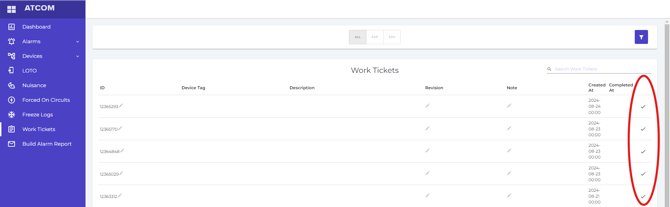
Once complete all alarm validations will be put into Work Tickets on ATCOM+, accessible by the left hand menu.
5. SAP Notification Download & Upload
When you have completed all desired SAP notification you will need to download a csv file and upload it to ATCOM+.
a. Locating List
Input transaction code "IW28" in the SAP home screen to generate a list of notifications that the user wants to integrate into a ATCOM+.
Click the Excel page(In red below)

b. Saving the CSV File
Pop-ups will appear and will be filled in the following ways,(click he green checkmark to progress through the pop-ups once filled):
.png?width=336&height=242&name=MicrosoftTeams-image%20(1).png)
.png?width=434&height=357&name=MicrosoftTeams-image%20(2).png)
"No. of key columns" will always be set to "0"
Select "Table"
.png?width=283&height=193&name=MicrosoftTeams-image%20(3).png)
Select "Microsoft Excel"
c. Turning excel into CSV file
Once Excel document is downloaded open it and "Save as" a CSV(Comma delimited)(*.csv) file.
d. Creating Alarm Report
Go to "Build Alarm Report" In ATCOM+'s main menu to start the alarm report which has 3 steps. 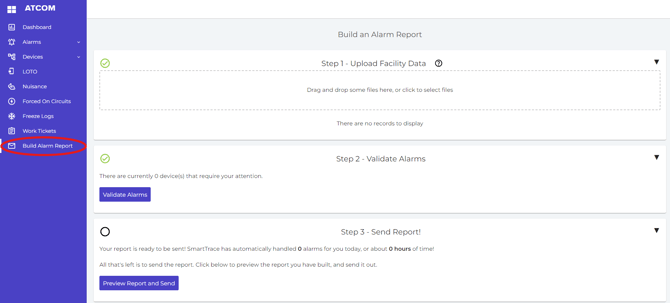
Step # 1: upload your CSV file.
Step # 2: Validate Alarms: Refer to step #5 for any alarms that have not been correctly validated.
Step # 3: Send report once complete Steps 1 & 2
Congratulations! You've achieved a significant milestone in optimizing your operations. By successfully generating SAP notifications and seamlessly integrating them into ATCOM+ through the Alarm Report feature, you've taken a proactive approach to monitoring and managing your systems. This integration not only streamlines your workflow but also enhances your ability to respond to potential issues swiftly and effectively. With this advanced capability at your disposal, you're well-equipped to ensure the reliability and efficiency of your operations.