Purpose:
The purpose of this article is to provide a detailed guide for configuring a Lantronix DR / XPress DR-IAP device using the Telnet command in Command Prompt. This method is preferred for its directness and control over the configuration process.
Resources:
- Article - How to connect & firmware update
- How to use the Ping Command
- How to enable Telnet on Windows 10
- How to enable Telnet on Windows 11
- How to use Wireshark
Device Setup
- Ensure the RS-485 wiring matches the diagram below. Note that the 120 Ohm resistor may not be required for all applications.

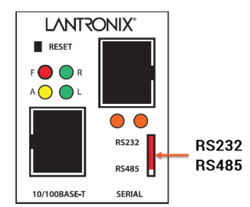
- Ensure the RS-485 selector switch is in the bottom position.
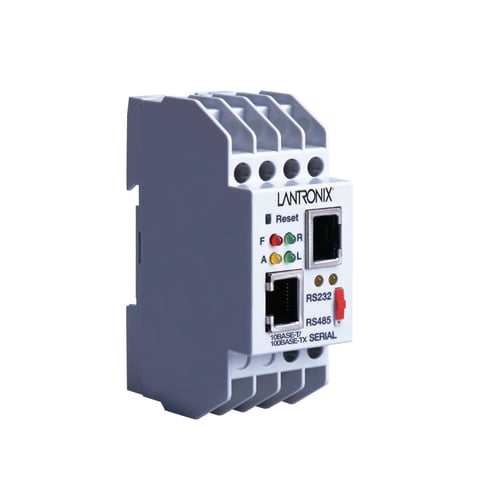
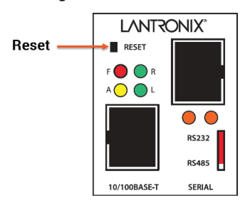
- XPress Status Lights: Check the status lights for proper operation.
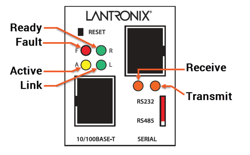
- XPress Reset Button: Use the reset button if needed to reset the device.
Configuring the Lantronix XPress using Telnet
Ensure your computer is on the same subnet as the device's IP address. You can watch the video above for a step-by-step guide.
Accessing the Lantronix Device via Telnet
- Open the Command Prompt.
- Type
telnet [IP ADDRESS] 9999and press Enter.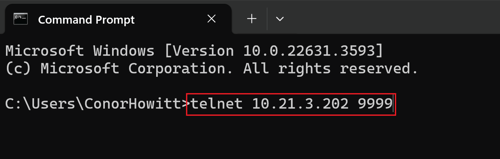
- Press Enter again to enter Setup mode.

Ensure Telnet is enabled on your computer.
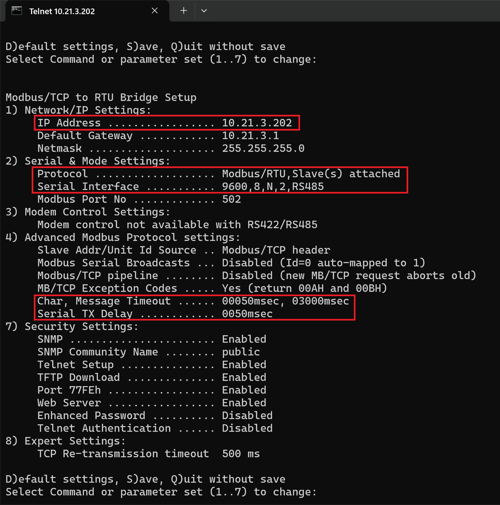
The configuration is divided into the following sections:
- Network IP Settings: Allows you to change the IP address.
- Serial Port Settings: Set the serial configurations to match the settings of the connected device.
- Protocol: Choose between Modbus RTU Slave or Modbus ASCII Slave, depending on your setup.
- Baud Rate / Parity / Data Bits / Stop Bits: These settings should match the configuration of the heat trace controllers you're connecting to.
- Modem Control Settings: Typically, these settings are not changed.
- Advanced Modbus Protocol Settings: Configure the Character Timeout, Message Timeout, and Serial TX Delay.
- Character Timeout: Will typically be set to 0msec or 50msec
- Message Timeout: Will typically be set to 500msec to 3000msec
- Serial Tx Delay: Will typically be set to 10msec to 100msec
- NA
- NA
- Security Settings: Typically, these settings are not changed.
- Expert Settings: Typically, these settings are not changed.
Modifying Configurations
To make modifications in the Telnet Setup window:
- Select the menu you wish to change (1, 2, 3, 4, 7, 8) by entering the corresponding number.
- Make the prompted modifications and move through the options by pressing
Enter.
Note: Making modifications can be a bit tricky, so we suggest you watch the instructional video linked above.
If you change your device's IP address, you may also need to adjust your laptop's IP address to be on the same subdomain as the new assignment.
Saving and Exiting
- Press
Sto save the configurations, orQto quit without saving. - Once you save the configurations, the Lantronix device will reboot, and the connection will be lost.
By following these steps, you can configure your Lantronix device efficiently. If you need further assistance or run into issues, refer to the user manual or contact technical support for more detailed guidance.
Typical Modbus Configurations
Note that the below are standard Modbus communication parameter setups. Some heat trace controllers have the ability to modify this but these are normally what they are.
|
Manufacture |
Controller Type |
Protocol Option |
Serial Setup (Baud Rate, Data Bits, Parity, Stop Bits) |
| nVent (Digitrace, Raychem) | 920 | Modbus RTU (serial) Modbus TCP (Ethernet) |
9600,8,N,2 |
| nVent (Digitrace, Raychem) | 910 | Modbus RTU (serial) Modbus TCP (Ethernet) |
9600,8,N,2 |
| nVent (Digitrace, Raychem) | NGC30 | Modbus RTU (serial) Modbus TCP (Ethernet) |
9600,8,N,2 |
| nVent (Digitrace, Raychem) | NGC40 | Modbus RTU (serial) Modbus TCP (Ethernet) |
9600,8,N,2 |
| nVent (Digitrace, Raychem) | T2000 | Modbus RTU (serial) Modbus TCP (Ethernet) |
9600,8,N,2 |
| nVent (Digitrace, Raychem) | Elexant 4010i | Modbus RTU (serial) Modbus TCP (Ethernet) |
9600,8,N,1 |
| Thermon | TC202/201/102/101 | Modbus ASCII | 9600,7,N,2 |
| Thermon | TCM2 | Modbus RTU | 9600,8,N,1 |
| Thermon | TC1818a | Modbus ASCII Modbus RTD |
9600,7,N,2 9600,8,N,1 |
| Thermon | TCM18 | Modbus ASCII Modbus RTD |
9600,7,N,2 9600,8,N,1 |
Modbus Polling Registers for Testing
|
Manufacture |
Controller Type |
Modbus Address | Function Code | Register | Value |
| nVent (Digitrace, Raychem) | 920 | Set on controller | 3 | 1 | |
| nVent (Digitrace, Raychem) | 910 | Set on controller | 3 | 1 | |
| nVent (Digitrace, Raychem) | NGC30 | Set on controller | 3 | 1 | |
| nVent (Digitrace, Raychem) | NGC40 | Set on controller | 3 | 1 | |
| nVent (Digitrace, Raychem) | T2000 | Set on controller | 3 | 1 | |
| nVent (Digitrace, Raychem) | Elexant 4010i | Set on controller | 3 | 1 | |
| Thermon | TC202/201/102/101 | Set on controller | 3 | 103 | Maintain Temp CCT1 |
| Thermon | TCM2 | Set on controller | 3 | 2 | Maintain Temp CCT1 |
| Thermon | TC1818a | Set on controller | 3 | 103 | Maintain Temp CCT1 |
| Thermon | TCM18 | Set on controller | 3 | 366 | Maintain Temp CCT1 |
nVent 920 Controllers utilize a Modbus address and a Sub Address.
Sub address 0 (zero), you will use the register number mentioned above. For every sub Address 512 is to be added to the register. Sub Address 0 = Register+0, Sub Address 1 = Register+512, Address 2 = Register+(512*2),
Depending on what Modbus Polling tool you use an offset of 1 may be required for the register number. Ex. If you aren't having luck increase the register number by 1.
Whenever polling an ACSII controller ensure the quantity of data bits your polling is always 1 bit.
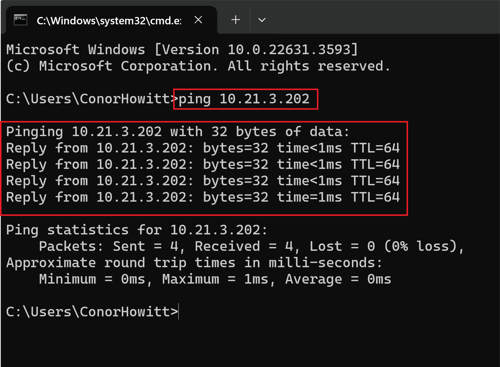
How to Ping an IP Address using Command Prompt
-
Open Command Prompt: Press
Win + R, type "cmd," and press Enter to open the Command Prompt. -
Ping Command Syntax: To use "ping," type the following in Command Prompt:
css -
ping [IP Address or Hostname]Replace
[IP Address or Hostname]with the actual IP address or hostname of your device. -
Execute the Ping Command: Press Enter to execute the command.
-
Interpreting the Results: The "ping" command will send several packets to the specified IP address or hostname and wait for a response. You'll see statistics showing the number of packets sent, received, lost, and the round-trip time. If you receive replies from the device, it confirms successful communication.
-
Terminating the Command: To stop the continuous ping, press
Ctrl + C